Strolling through Washington D.C. on a rainy spring evening...
Washington D.C.: United States Capitol Building on a rainy night
Washington D.C.: Washington Monument on a rainy night
Stock Photography
Strolling through Washington D.C. on a rainy spring evening...
Washington D.C.: United States Capitol Building on a rainy night
Washington D.C.: Washington Monument on a rainy night
I have been doing a little bit of Microstock here and there for a few years but never really applied any analytics to it. Four months ago, I set out with the goal of tracking my progress and quadrupling my Microstock income purely by spending four hours a week in the first month, two hours a week in the second month, and one hour per week in the third and fourth month on it. My first four hours were spent on researching various Microstock sites, creating new accounts and developing a spreadsheet to track my progress. The second four hours were spent tagging all the images with Metadata and uploading them. There is a nifty tool called ProStockMaster that allows you to submit to all the major Microstock sites at once. During the four months, I almost doubled my portfolio purely out of pictures I already had but never used ranging from objects to lifestyle (a rough average of what's out there). I did not reach my goal of quadrupling my income, but I increased it by a factor of 3.5, which is pretty good.
On the way there, I found out which sites actually make you good money and which ones don't. I also made several accounts to track different factors that aren't part of this write-up, so here goes the summary ranked by awesomeness (which is how much money they made me). Just so you know, I have a degree in economics and finance, so I actually know about this stuff.
1) Shutterstock (link) Acceptance Rate: 60% % of Total Monthly Income: 38% Average Earnings per Download: $0.42
2) Dreamstime (link) Acceptance Rate: 65% % of Total Monthly Income: 31% Average Earnings per Download: $1.70
3) iStockphoto (link) Acceptance Rate: 38% % of Total Monthly Income: 12% Average Earnings per Download: $0.74
4) 123rf (link) Acceptance Rate: 98% % of Total Monthly Income: 9% Average Earnings per Download: $0.59
5) DepositPhotos (link) Acceptance Rate: 74% % of Total Monthly Income: 4% Average Earnings per Download: $0.37
6) Fotolia (link) Acceptance Rate: 63% (I found the approval process to be a hassle, so I didn't bother to upload all images.) % of Total Monthly Income: 3% Average Earnings per Download: $0.38
These are the six Microstock sites I would go with. The other ones had no or only very minimal payouts below 1% of my monthly income. They were: CanStockPhoto, BigStockPhoto, PantherMedia, YayMicro, CutCaster, and StockFresh.
Some call it separation lighting, others prefer the term isolation lighting, but both mean the proper lighting technique to separate your subject from the background. While this technique is applied just about everywhere in photography where a subject is the main focus, this technique is a particular for Stock Photography, where the proper separation technique determines if your image will sell or not. As you will see, the lighting techniques that I will show you are very straight forward and you can easily use them to make a decent side income on sites like Dreamstime. If you want to learn more about Stock Photography, check out my recent posts (here and here). Separation Lighting Setup 1 With this setup, you have a main light on camera left to light the subject, a fill light on camera right to fill in the shadows, and a separation light on the background. If you don't have three lights, you can also use a reflector for fill. To get a cleaner separation light (e.g. for high key white backgrounds), use two lights on the backgrounds placed on each side and a little behind the subject.
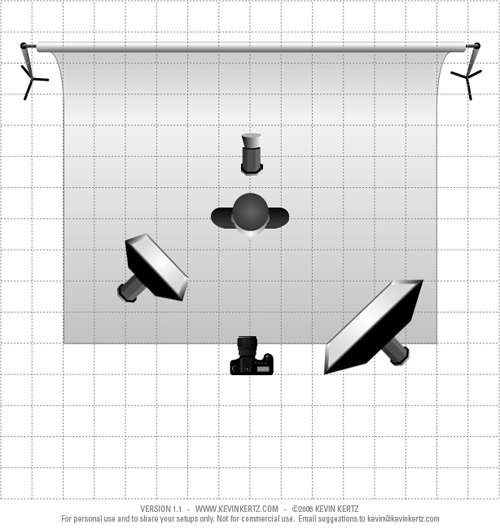
LightingSetup
Separation Lighting Setup 2 This setup is very similar to the first setup, but instead of having a strobe standing on the floor and illuminating the background, you now have a boom arm with a softbox on it. This has the advantage that you can tilt the softbox over your subject, which gives you a nice specular highlight (hairlight). Naturally, this method is not as good for high key white backgrounds.
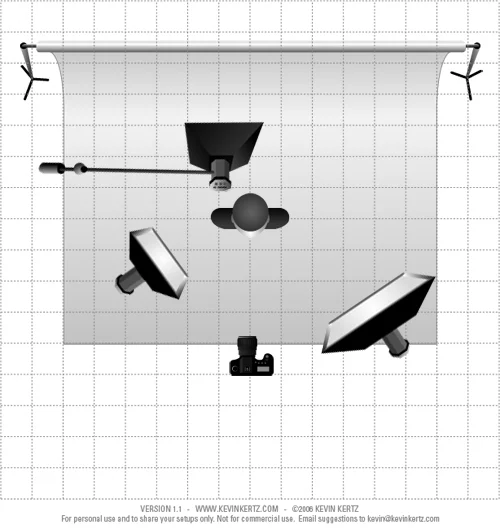
LightingSetup
Separation Lighting Setup 3 For this setup you either need a really big softbox or a translucent background that you can light up from behind. Aside from that, the main light and fill light are the same as the first two setups. Just be sure that you know how to avoid unwanted lens flare or loss in contrast, when you use this setup.

LightingSetup
Plug If you like this post, you can help me keep writing stuff like this by buying your camera equipment using my promotional links for Amazon, Adorama, and B&H Photo. I have been using these stores for years for their great customer service, quality, and low prices. Using these links does not cost you anything, but it helps me cover some of the costs associated with running a website and taking time out of my day to write these posts.